Quotas in Events Management System
 Print
Print Email
EmailHow to configure and edit quotas in the Events Management Systems.
Quotas allow you to limit the number of people allowed to register for your entire event or a specific question in your event's registration form.
Creating a Quota
1. Quotas must be created before activation is requested. If you need to set up a quota after your event has been activated, please email events@anr.msu.edu with your event ID and quota details.
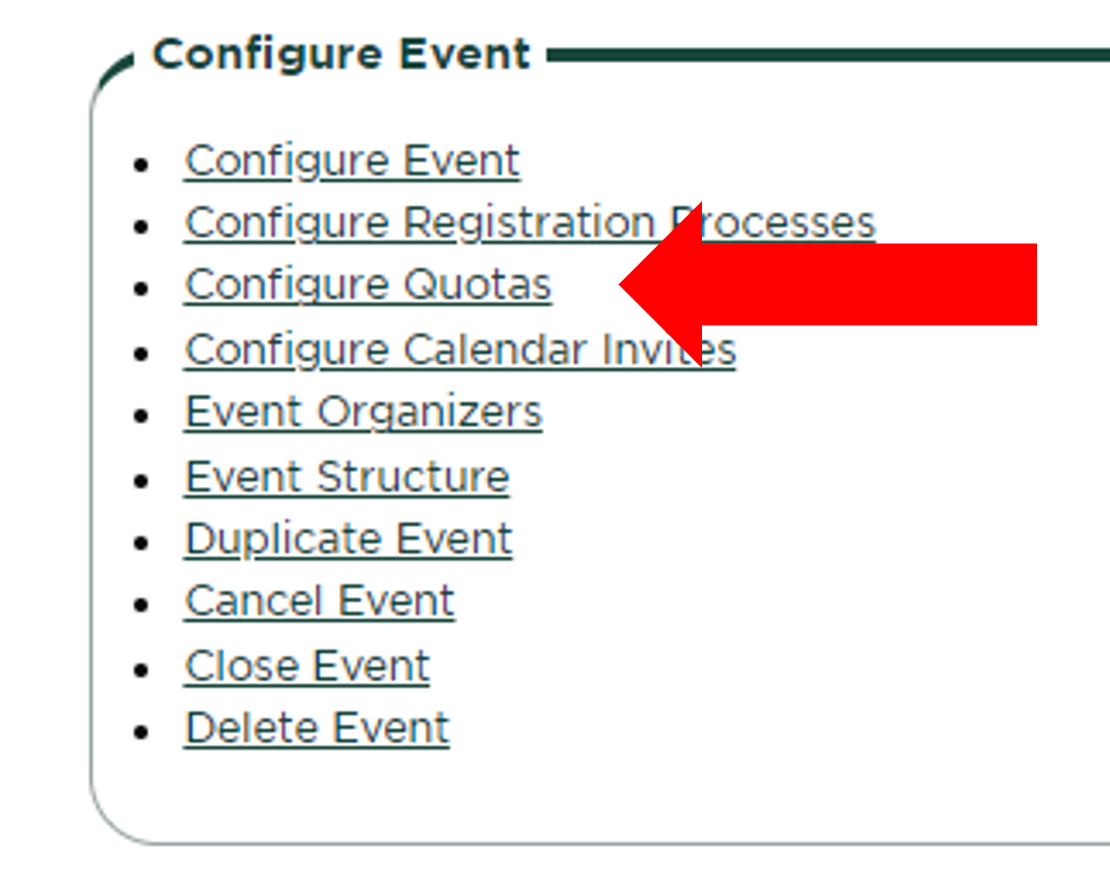
2. On the event dashboard, click "Configure Quotas".
3. Select the scope of the quota.
Creating a quota for your entire event means that the quota will apply for all registrations within your event, even if you have multiple registration processes (such as speakers, participants, adults, youth, etc.). If you only have one registration process, select Entire Event.
Creating a quota for one registration process means the quota will only apply for one registration process within your event. For example, you may want to limit the number of volunteers if you have a volunteer registration process, but you don't want to limit the number of youth attendees in the general registration process.
4. Select how the quota will be applied, then click Next.
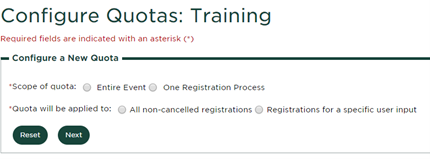
"All non-cancelled registrations" means the quota will be applied to all registrations that are not cancelled.
"Registrations for a specific user input" allows you to select which registration question you would like to apply the quota. With this option, you can add multiple quotas in the same registration form. For example, you may add quotas for individual breakout sessions, event dates or locations, t-shirt sizes, etc. After selecting "Registrations for a specific user input", a drop down menu will appear for you to select the registration question for which the quota will be applied.
5. Edit your quota details, including the quota minimum and maximum. If you do not have a minimum number of attendees, leave the minimum as 0.
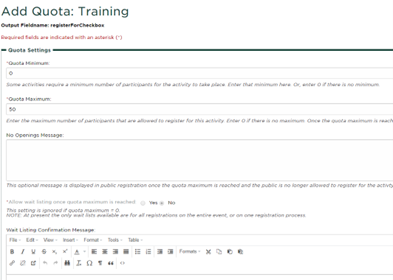
No Openings Messages may be added if you would like a statement to show up on your registration form once the quota has been reached.
Wait List Confirmation Messages can be added for quotas that are event-wide or registration process specific. Wait List Confirmation Messages can NOT be added to specific user input quotas.
6. Make sure the quota is marked as active, then click "Create Quota".
If you need to create multiple quotas for your event, you will need to repeat this process as necessary for each quota.
Tips:
- Start from scratch with your quotas. Quotas carry over when duplicating an event, so remove existing quotas when you duplicate an event to avoid creating quota errors when changing information.
- If you change a question that already has a quota, you may also need to recreate your quota. When you change a question in your registration form, you are changing the stored information of the question, which is how the quota is attached to the question. Deleting and re-creating a quota when you change a question will ensure your quota functions properly.
- You can use quotas to manipulate and close events with multiple date options.
- If an event allows registrants to select multiple days of an event, you can set a quota on each date option. As each date option passes, you can reduce the quota amount on that date to "close" the option from future registrants.
- It is best practice to leave wiggle room in your quota if you are setting it for the absolute maximum number of attendees because event registrations can surpass existing quotas if multiple people register at the same time.
- For example, if two people are completing registrations at the same time for an event with one spot left, their registration is not recognized until submitted. If both individuals submit their registration at the same time, the event will be oversold by one spot.
- Therefore, always reduce your quota maximum to take into account staff or speakers that are not registering and add in a few extra "seats" in case your event accidentally oversells like in the example above.
- If an event has a quick turnaround (meaning it sells out in 24-48 hours), please reach out to ANR Event Services to help with the registration process. ANR Event Services can close the event, help cancel duplicate registrations and incomplete forms, and re-open the event if additional spots become available.
- Once your event is active, you can still manage your quotas. You cannot create new quotas once your event is active; new quota requests for an active event can be sent to ANR Event Services at events@anr.msu.edu.