Testing and corrective procedures for low substrate pH
Methods to determine substrate pH and corrective procedures to increase the low pH substrate in greenhouse and nursery plants.

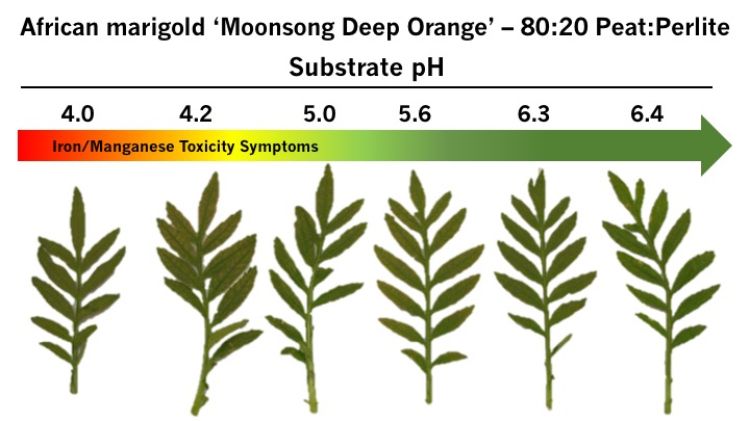
Over the past week, numerous growers have reported low substrate pH or growing medium problems to Michigan State University Extension. If you mix your own or purchase a pre-mixed substrate, it is recommended you determine the initial pH. Determining the substrate pH prior to sowing seeds, sticking cuttings or transplanting liners may save your crop from low substrate-induced problems such as bronzing, purpling or spotting of the leaves. Therefore, this production challenge warrants discussion and distribution of corrective procedures.
Before testing
Before any pots or flats are filled, it is important to determine initial substrate pH regardless if you mix your own or purchase pre-mixed. The best method to determine initial substrate pH on-site is by conducting the 1:2 dilution test. To perform this test, you first need to prepare your substrate sample. Collect a representative sample of the substrate you plan to test. Moisten the substrate, but be careful to not to add too much water. The substrate should form a ball when squeezed in your hand when making a fist. Very little water if any should drip from your fist.
After moistening the substrate, place it in a plastic bag, seal and allow the lime to react for three to four days to ensure the best accuracy. After the pH has had time to equilibrate, you are now ready to determine the initial pH of your substrate.
Materials needed
To determine the initial pH of your substrate, you will need a few materials:
- One measuring cup
- 1 gallon distilled water
- Four 16-ounce cups
- One spoon
- Calibrated pH meter
Follow these eight easy steps to determine your substrate pH prior to planting:
- Collect three 4-ounce samples of substrate and place in each of the 16-ounce cups. This provides you with a more representative sample.
- Combine 4 ounces of substrate with 8 ounces of distilled water in each of the 16-ounce cups.
- Stir each sample with the spoon and allow the sample to stand for 30 to 60 minutes to equilibrate.
- Using a calibrated pH meter, measure the first sample by inserting the electrode into the cup and giving the solution a gentle swirl for 3 to 5 seconds.
- Record the pH and electrical conductivity (EC) of your sample.
- Clean the electrode by inserting and gently swirling it in another cup of distilled water.
- Repeat Steps 4-6 as needed until all samples have been measured.
- Average the pH of your substrate sample to determine the initial pH.
To view a “how-to” video on conducting a 2:1 pH test, check out “Measuring Initial Substrate pH” from e-Grow.
If you suspect the pH of your pre-mixed media might not be within the desired range, you should test the pH of each lot (load/bale). Keep records of your pH readings.
If you have determined the initial pH of your substrate is too low, there are a few steps you can do to increase the substrate pH.
Corrective procedures
Prior to transplanting
- Pre-mixed substrate: Contact your substrate sales and technical representative.
- Self-formulated or mixed: Amend dolomitic or calcitic lime as needed. It is recommended to amend lime and determine the substrate pH in small test quantities before amending a large volume.
After transplanting
Corrective procedures to increase substrate pH after transplant | ||
|---|---|---|
|
Option |
Recommended rates |
Notes |
|
Flowable lime |
Use 1 to 2 quarts per 100 gallons of water.
|
|
|
Hydrated lime |
Mix 1 pound in 3 to 5 gallons of WARM water.
|
|
|
Potassium Bicarbonate (KHCO3) |
Use 2 pounds per 100 gallons of water.
|
|
Source: “Diagnosing Signs of High and Low pH” by Brian E. Whipker, e-Grow Alert January 2014.


 Print
Print Email
Email


